This document summarizes the different concepts that are necessary to get started using Final Cut Pro X. The current version 10.7.1 was released on December 21, 2023. There are some great training videos from the folks at Ripple Training (using version 10.4). If you prefer, you can download the training videos in the form of an app from the Mac App Store.
When it was first introduced, the complaint about Final Cut Pro X (FCPX) was that it looked a lot like iMovie. That is less the case today but, even if it resembles iMovie, don’t be fooled, this is an incredibly powerful program. There are lots of professional video editors making a living with this program. If you shun it simply because of what you’ve heard, well then you’ll be missing out. If you’re willing to give it a chance, my opinion is you won’t be disappointed, and you may even come to love it like I do.
If Final Cut Pro X is ultimately too intimidating, you can start out by using iMovie, a simplified editing program that shares some of the great features of FCPX. We have information and tutorials on iMovie elsewhere on this site.
Hard Drive Prep
The first thing that you should do before using FCPX (or iMovie), is to prepare a hard drive to use for editing. Like all video editors, Final Cut Pro X need lots of hard drive space. We previously recommended not to use the internal hard drive, as typically these were relatively small drives and projects would fill it up quickly.
However, with the advent of very fast solid state drives (SSD) and relatively large capacities, there is a balance that must be considered. Many Macs can be configured with internal SSDs up to 8TB (and larger in the near future), with 512 to 1TB being a common or average. Again, these drives are fast and are recommended for editing high resolution content (4K and 8K timelines). It is recommended that you get a fast external drive as well.
Drives in the 1 to 2TB size are in a good price range as of June 2023, which is less than $130 for a 2TB external SSD. In general, buy the biggest internal AND external hard drive you can afford, and swap out projects from the external to the internal, and vice versa.
We also recommend that you purchase an “archive” hard drive of around 5TB. These typically sell for about $100. These are what are known as “spinning” hard drives, which are slower than SSDs, but can be used to back up projects and files. You are backing up you files right? You may also want to look at backing up files in the cloud with services like Google Drive, OneDrive, Dropbox, iCloud, or Backblaze. This provide extra insurance by keeping your files saved in more than one place.
Rather than constantly updating models and prices of drives, here are a few suggestions from The Wirecutter website:
Wirecutter – Best External Desktop Hard Drive
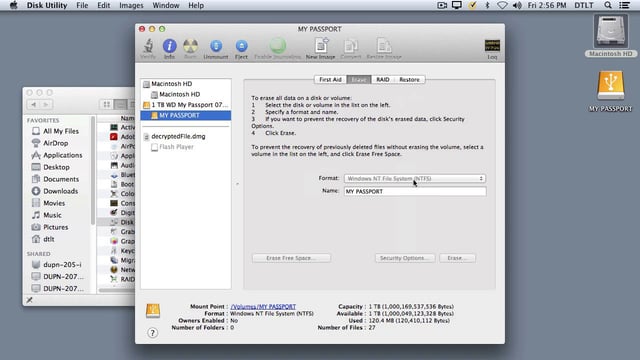
One additional point on hard drives, and specifically formatting. You may have a situation where you are trying to move files from a Windows computer to a Mac or vice-versa. It can be done in a fairly straight-forward way by formatting the drive as what is known as ExFAT. If you have a relatively new Windows or Macintosh machine, ExFAT should be available as a formatting option. We previously talked about prepping a hard drive to work with Final Cut. However, if you format the drive to work with FCPX, it will not be readable in a Windows PC. If you format the drive on a Windows PC, it won’t be usable in Final Cut Pro X. An ExFAT formatted drive will work in both a Mac and a Windows PC to read and write files, but you can’t use an ExFAT drive for editing in Final Cut Pro X. It needs to be formatted specifically for the Mac.
If you search the web, and especially YouTube, you’ll find plenty of tutorials for getting started with FCPX. If you decide you need to get a complete tutorial with a ton of information, including great tips, I highly recommend Ripple Training and their video Learn Final Cut Pro in Under 60 Minutes.
Import Your Footage
The next step after prepping your hard drive is to start Final Cut Pro X and import your video footage. Before you import, you may want to create what is known as a camera archive. It allows you to simply dump your footage from the SD card to your hard drive. Then you will have a file on your hard drive that will look and act like you have the SD card still plugged into your computer. Very handy (and quicker than importing the media into FCPX) if you want to use the SD card as soon as possible.
Whether you are importing directly from your SD card, or using the camera archive, the next step is to import your footage into Final Cut. The import dialog box will ask you about transcoding your media. You can create optimized media (very high resolution and quality video that takes up lots of space), create proxy media (good quality video that takes up less space and is created more quickly), or you can do both. Clip optimization (the Create “Optimize” media choice) transcodes to high-quality ProRes (an Apple codec for video). “Create proxy media” uses a more compressed version of ProRes.
Begin Editing
Now it’s time to edit. After your footage is imported (it will continue to transcode, but you can begin editing), it will be shown in the Event Viewer. This is where you pick what footage you want to use in your story. Why do I say story instead of project or production? Well, it points to what Final Cut Pro X is great at. Many people refer to clips that are added to Final Cut Pro X’s “Timeline” as the “Storyline”. It is partly a semantic difference, but it is conceptual as well, and it helps inform you as to what FCPX’s strength is – helping you tell stories.
It’s called the “Magnetic Timeline” – everything collapses together automatically on the timeline. There are no gaps that you need to close when clips are removed from, or around in, the timeline. It may not be what you’re used to, but if you get the hang of it, I think it’s the most powerful way to edit.
It should be said that there is a certain amount of organization that needs to happen with your footage. The Event Viewer does much of this automatically for you. When you import FCPX will organize footage into shots that contain people (one, two, group) and types of shots (wide, medium, closeup). You can the review the footage and begin tagging favorite clips, or reject clips that you won’t use. We won’t go over it here, but just be aware that Final Cut has very powerful organizing tools to help you get the right material in your story.
Next, I’m going to introduce the keyboard shortcuts that you should learn for FCPX. Using the keyboard for editing, especially for new users, might be somewhat counterintuitive, but once you learn the commands on the keyboard, you will fly through your editing work. Trust me.
Keyboard shortcuts – Learn Them!

Get a PDF of the shortcuts image above
Here are more details about Final Cut Pro shortcuts:
⌘ (Command)+1 – put focus on Event Browser
⌘ (Command)+2 – put focus on Timeline
⌘ (Command)+3 – put focus on Event Viewer
⌘ (Command)+b (mnemonic “blade”) – Splits the clip at the Skimmer/Playhead
Spacebar – Will Play or Pause your video in the Timeline. This is probably THE most important keyboard shortcut. Think about it. How much sense does it make to grab your mouse and zero in on and click the play button, or instead tap the biggest “key” on your keyboard?
Home – Move playhead to the beginning of the timeline (if you’re using a Mac laptop the “fn” key + ← [left arrow] is equal to the “Home” key)
End – Move playhead to the end of the timeline (if you’re using a Mac laptop the “fn”key + → [right arrow] is equal to the “End” key)
*** Note, Home and End only appear on the Mac Extended Keyboard ***
i – mark the in point
o – mark the out point
/ (slash) – play selected clip in the Event Viewer from beginning
↓ (down arrow) – go to start of next clip in storyline
↑ (up arrow) – go to start of previous clip in storyline
→ (right arrow) – move forward one frame in storyline
← (left arrow) – move backward one frame in storyline
e – add clip to the end of the storyline (mnemonic “eppend” or “add to end”)
w – insert video at playhead (mnemonic “within”)
q – connect clip to primary storyline (mnemonic “qonnect”)
Option+[ – Trim start of clip to the position of playhead, or skimmer, if active.
Option+] – Trim end of clip to the position of playhead, or skimmer, if active.
Option+w – Insert a gap (default duration of 2 seconds) into the Timeline at the position of the playhead, or skimmer.
Shift+? – Play around the current position when the playhead is between clips. This is handy for checking an edit between two clips including any transitions.
Shift+⌘+f – Display Timeline video full-screen (esc key returns from full screen view).
Control+s – expand the audio track contained within video clip on the storyline.
v – Disable/Enable a clip in the storyline
Note that for all commands the Skimmer is primary and Playhead is secondary.
MORE COOL KEYBOARD SHORTCUTS
j – play in reverse (repeat press doubles speed)
k – pause
l – (lowercase “L”) – play forward (repeat press doubles speed)
k+j or l modifies the speed to half in forward or reverse
, (comma) key nudges clip one frame in storyline to the left – . (period) nudges it one frame to the right. Shift + comma or period nudges in 10 frame increments. Option + comma or period gives 1/80 frame accuracy
Control+p followed by a timecode entry – Jumps the Playhead to that specific timecode in the Timeline.
Create a Gap clip by selecting a clip in the storyline and pressing the Delete key ( ⌦ ) – note this is not the standard “backspace” key, but the one only found on the Mac extended keyboard.
Shift+Q – Back-time the selected clip in the Event Browser as a Connected clip. Back-timing edits the end of a clip to the position of the playhead, or skimmer.
Shift+D – Back-time the selected clip in the Event Browser as an overwrite edit to the Primary Storyline.
Option+[spacebar] – When the skimmer is active, this starts playback at the position of the playhead.