Ingredients:
1 – Computer (Mac OS)
1 – Apple’s iMovie program
1 – Video clips that need a Voiceover (narration) recording
Directions
-
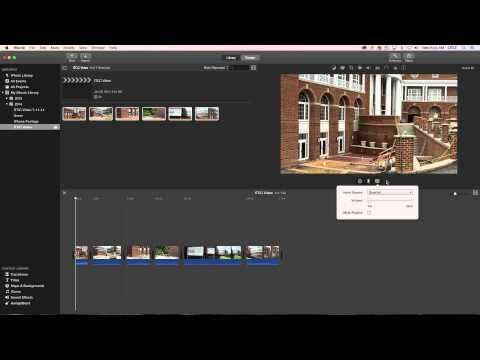
Open iMovie
-
Go to File → New Movie, or click the New (+) button and choose Movie
-
Select a Theme (to keep it simple choose No Theme), then click the Create, and give your movie a name.
-
Now you’ll import your video clip that you want to voiceover. Go to File → Import Media… or drag the video into the Event area.
-
Next select the clips that you have imported by highlighting them all with the mouse
-
Once clip or clips are selected, drag them into your Timeline or press the E key on your keyboard. All the clips will move into your timeline.
-
Next go to the Window menu and choose Record Voiceover, or you can press the V key on your keyboard.
-
Place your Timeline cursor at the point in your video where you want to start recording (you’ll be able to move the voiceover audio where you want it after you record).
-
In the Playback window there will be three icons. X will close the Voiceover tool, the Microphone symbol starts the recording, and the Voiceover Options Button, which includes Input Source and Input Volume.
-
Click on the Input Source button and make sure your input device is selected (in this tutorial we are using the built-in microphone).
-
The Microphone symbol is also a “level meter” – green means you’re not too loud, yellow means getting close to peak volume, and red means your “peaking” or too loud. Try to keep mostly yellow or alternating green/yellow. Definitely NO RED! Adjust your distance to the microphone and the input Volume to get the right loudness.
-
To start recording, click the Microphone Symbol in the middle (it will give you a three second countdown and then you are ready to begin recording).
-
When finished recording, click the microphone symbol again and that will end your recording. A new audio clip will be placed on the Timeline.
-
Again, you can move this recording anywhere you want on the clip by clicking on the green audio clip and moving it left or right.
-
If you have audio on the original video clip that you don’t want to hear, simply right click the clip and select detach audio. A “new” green audio clip will appear on the Timeline
-
Once you detach the audio from the video, click on the resulting audio clip and press the Delete key.