Events and Projects in Final Cut Pro X from umwnewmedia on Vimeo.
Ingredients
1 – A Macintosh computer running OS 10.6.8 or better and meets the specs
1 – The FInal Cut Pro X Mac app
1 – A external hard drive, preferably a portable drive with USB power (we recommend Western Digital)
1 – Media from a video camera (an SD card is used in this example)
Directions
- Connect your external drive to your computer and insert the media card or connect your camera to your computer.
- If you get a message asking you to use your drive as a “Time Machine” backup, select “Don’t Use”. See the recipe on Formatting your drive to work with FInal Cut Pro X for more information.
- Start Final Cut Pro X. It will be in your Dock or in the Applications folder.
- Note that in the top left, the Event Library, you have at least two drives listed, your Macintosh HD and your external drive (with the name you gave it). When Final Cut Pro X is started for the first time after it is installed, it creates a new event library.
- In the lower left is the Project Library, again with at least two drives listed.
- In either the Event Library or Project Library, if there are small arrows next to the drive names, that means there are Events or Projects on those drives. Clicking the arrows will reveal the Events and Projects.
- Now, you can either create a new Event, in the Event Library, or a new Project, in the Project Library by clicking on the appropriate button.
- In the example we create a New Project on the external drive. We give it a name and click OK.
- Next we create a new Event Library by clicking the Import Media button.
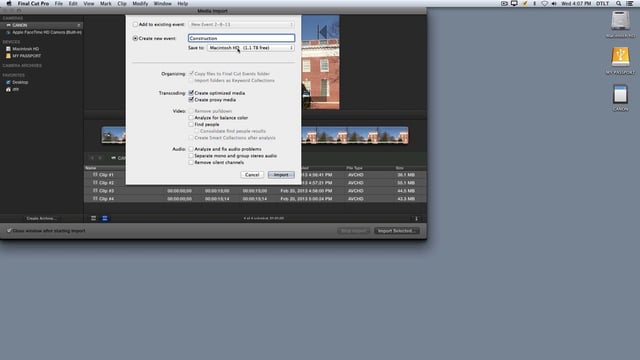
- This is where we will import clips from your media card. Select your clips and click the Import Selected button.
- Create a new Event. Make sure to select the external hard drive from the Save to: drop-down. Adjust the settings if desired and click Import.
- You can view your progress by choosing Window > Background Tasks from the menu bar. Once it completes you can edit your footage.
- You can continue working until you need to quit. Final Cut Pro X will automatically save your progress (unless your in the middle of something that needs to finish). Your work will be saved automatically and you can start Final Cut Pro X again and pick up where you left off.
- You can move events or project from drive to drive within Final Cut Pro X by dragging and dropping.
- You can view the files on your external hard drive by looking in the Final Cut Events and Final Cut Projects folders. ONLY MOVE OR DELETE EVENTS OR PROJECTS WHILE IN FINAL CUT PRO X. Don’t move or delete these files while viewing your hard drives or it will affect your projects in potentially disastrous ways.