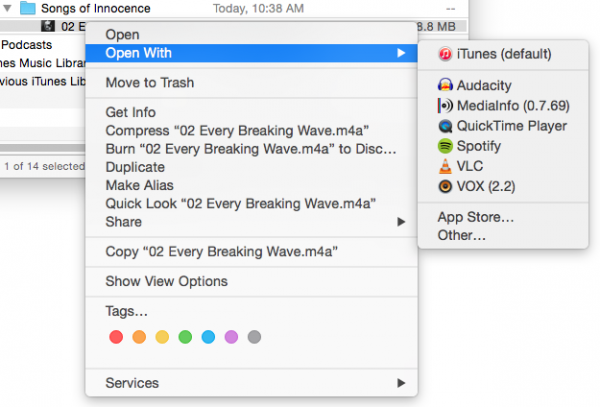
Import Audio – File > Import > Audio… – Or you can drag the file into the Audacity Window.
Playback – Get used to using the Spacebar for Play/Pause. Also, if you have a keyboard with “Home” and “End” key they will transport you to beginning and end of projects. Otherwise click the mouse in the timeline where you want to start playback and hit the play button.
What is a Project? – An Audacity project (an .aup file) is the aggregate of manipulations done to the audio files. You may have several sound files/effects/music in your project. The project file remembers the placement and edits of those files. It is a text description of what is happening in a given sound project. There is a project file and a data folder that should ALWAYS be kept in the same relative place on your computer – don’t move one without the other.
Toolbars – Some Toolbars can be moved or even brought outside the Audacity window. To put everything back choose View > Toolbars > Reset Toolbars.
Recording – Hitting the Record button creates a new track (whichever you have selected – Stereo or Mono) and begins recording. The Stop button will end the recording. Hold down the Shift key while clicking the Record button to “append” the recording to the current track.
Tracks – Mono & Stereo – Stereo records separate sounds in the right and left channels. Mono records everything into one channel with no separation.
Selections – In order to manipulate your sound, you need to select it in the timeline. Use the Selection tool by clicking down the mouse and dragging left or right to select a portion of the sound. Use Command (Mac) or Control (PC) + A to select all of the sound. Use the bracket keys – [ ] – to select an “in” and “out” point while the sound plays.
Cut Copy & Paste and Trim – Audacity will work in a similar manner to the way Microsoft Word manipulates text. You can select and move parts of sounds from one place to another. Trim gets rid of whatever is not selected in the timeline.
Effects – Fade In Fade Out – Select the beginning portion of the sound and select Effect > Fade In, or select the end portion of the sound and select Effect > Fade Out.
Export – WAV & MP3 – To save your edited sound you need to Export it (you can also save your project, but that just saves the edits you have made). Select File > Export… Give your file a name, choose the Format you want to save in (Wav, MP3, etc.), and choose the location to save. Then click the Save button. When choosing the Format, there may be some options that you can select, for example the “quality” of an MP3 file. WAV files are higher quality compared to MP3, so always try to edit with WAV files and then export to MP3 when you have finalized all of your edits.
LAME MP3 Encoder – Now included in Audacity! Previously you had to download the “LAME MP3 Library” file separately, which included the MP3 codec. Not any more. Just one less thing to install to start using Audacity.
Background Noise and Silence – Audacity allows you some control over the “noise” in your recordings. You can get a “noise print” (a selection of the noise you want to isolate) and then have Audacity remove that. You can also select a section of a sound that has coughs or other unwanted noise and silence them (or delete them). Select that area and then click the Silence button, or choose Generate > Silence…
Additional Help – https://manual.audacityteam.org/